Thursday, April 27, 2017

Friday, April 21, 2017
Friday, December 30, 2016
Sunday, December 25, 2016
Tuesday, December 20, 2016
Sunday, December 18, 2016
iTunes Music to Android - How to Transfer Songs from iTunes to Android Phone
 After using iPhone, iPad or iPod Touch for a very long times, there must have tons of musics tied in iTunes. It may make you confused if you decide to switch to a new android phone, such as Samsung Galaxy S7, Note 7, etc. You may know that there is no direct way to transfer music from itunes to android. Don't be afraid, here are options for you to transfer iTunes musics to android.
Option One: Transfer iTunes Music to Android Using Phone Transfer
Jihosoft Phone Transfer has been released for more than 7 years and now accepted by countless numbers of iPhone or android users. Why it is so popular among mobile phone users ? This program empowers users to transfer data from android/iPhone/iTunes to android phone, including contacts, photos, videos, SMS, notes, musics, etc.


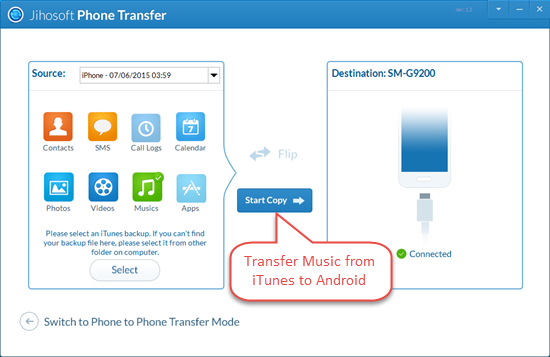
Step 2: Click "Restore from iTunes Backup" and connect android phone to computer using USB cable.
Step 3: The phone name will be displayed in the Destination Part after successful connection. Now you can choose an iTunes backup file from the file list and select "Music" to begin ransfrring music from iTunes to android.
Option 2: Transfer iTunes Library to Android via Copy & Paste.
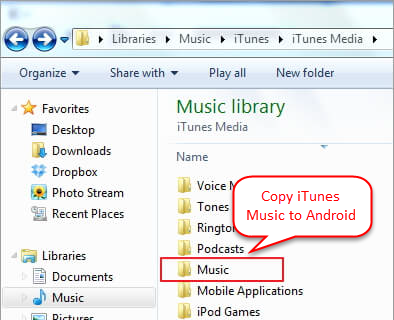
Find the location of your iTunes backup file: To find a list of your backups, go to \Users\(username)\AppData\Roaming\Apple Computer\MobileSync\Backup\.
Windows XP – C:\Documents and Settings\(username)\My Documents\My Music\iTunesWindows 8, 7, Vista – C:\(username)\My Music\iTunes
Mac OS X – /user/username/Music/iTunes
Copy and paste iTunes Music folder to android folder after connection android phone to computer.
More Tutorials on:
iTunes to Android: Sync/Transfer iTunes to Android Phone in Clicks
How to Transfer Music from iTunes to Google Nexus 6P/5XTuesday, December 13, 2016
Sunday, December 4, 2016
Tuesday, November 29, 2016
2 Guides to Transfer Musics from iTunes Playlist to Android Phone
If you have been using iPhone, iPad or iPod Touch for a very long times, you must have saved a large number of musics on your iDevice. Music management tool like iTunes enables music fans to backup all musics with their iPhone 7, iPhone 7 Plus, iPad or iPod Touch. When you are tired of using iDevice and willing to switch to Samsung Galaxy S7, LG or Huawei, what can you do with your favorite songs in iTunes ? Never fear, this post supplies 2 guides to transfer music from iTunes to android.


Method 2: Manual Way – Drag & Drop
The Manual move is a straightforward way if you just want a few choice tracks. You can transfer music from iTunes to Android with a USB cable and do it the old fashion way by clicking and dragging.
1. Find the location of your iTunes media folder:
Windows XP – C:\Documents and Settings\(username)\My Documents\My Music\iTunes
Windows 8, 7, Vista – C:\(username)\My Music\iTunes
Mac OS X – /user/username/Music/iTunes
2. Connect your Android phone as an external hard drive via USB cable.
3. Open the iTunes media folder to copy and paste iTunes music to your Android device music folder.
How to Transfer/Sync iTunes Music to Google Nexus 6P/5X
Method 1: Transfer Musics from iTunes to Samsung, Huawei, LG, HTC Using Phone Data Transfer
If you have a large amount of musics to transfer from iTunes to Samsung Galaxy S7/S7 Edge, Huawei P9, HTC One M8, Sony Xperia Z3, Lg G5...you'd better use this tool. This program enables to transfer musics, contacts, photos, videos, notes and more data from iTunes to android phone or iPhone.
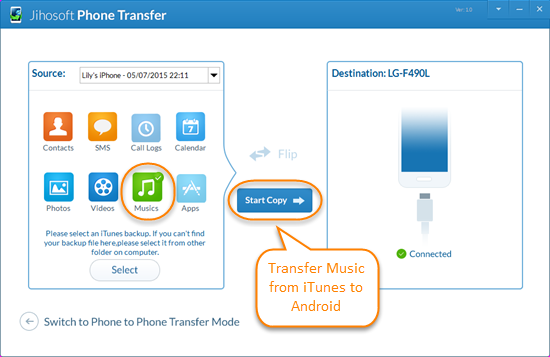
1. Download and launch Jihosoft Phone Transfer from its official site, select "Restore Data from iTunes Backup".
2. Connect your android to computer using USB cable, this program will automatically detect this device.
3. Tap on an iTunes backup file from the Source part, select "Musics" from the data types and click "Start Copy" to start transferring musics from iTunes to android.
Method 2: Manual Way – Drag & Drop
The Manual move is a straightforward way if you just want a few choice tracks. You can transfer music from iTunes to Android with a USB cable and do it the old fashion way by clicking and dragging.
1. Find the location of your iTunes media folder:
Windows XP – C:\Documents and Settings\(username)\My Documents\My Music\iTunes
Windows 8, 7, Vista – C:\(username)\My Music\iTunes
Mac OS X – /user/username/Music/iTunes
2. Connect your Android phone as an external hard drive via USB cable.
3. Open the iTunes media folder to copy and paste iTunes music to your Android device music folder.
More Tutorials on:
How to Transfer Music from iPhone, iPad or iPod to iTunesHow to Transfer/Sync iTunes Music to Google Nexus 6P/5X
Thursday, November 3, 2016
How to Transfer Contacts from iPhone to Android Phone
Congrats that you have switched from iPhone to android phone, maybe the the newest Samsung Galaxy S7, Note 7, HTC 10, LG G5... You must be excited to get a new phone. What you need to do now is to transfer all the contacts from iPhone to android for more convenience.


How to Transfer Music from iPhone to Android Phone
Switching from iPhone to Galaxy: Transfer Data from iPhone to Galaxy Phone
This tool is developed by Jihosoft Studio to transfer data between 2 different carriers, including contacts, photos, videos, musics, messages, notes, etc. You can download this program from the download icon below.
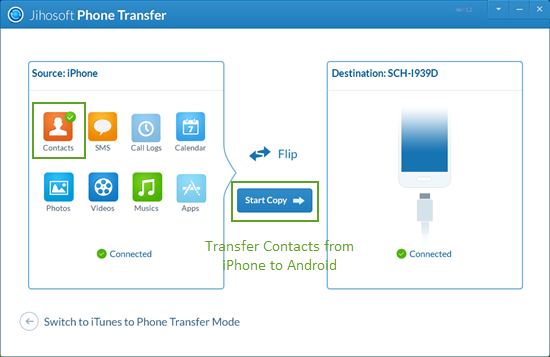
- Launch this software on computer and click "Phone to Phone".
- Connect iPhone and android to PC, after connection, make sure that the Source phone is iPhone and the Destination phone is android.
- Now you can select "Contacts" from the file types and click "Start Copy" to transfer contacts from iPhone to android phone.
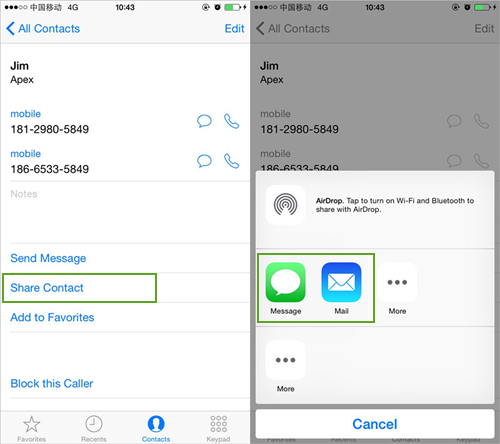
- Transfer iPhone Contacts to Android via Share Option
Tip: This Method is only appropriate to transfer a small number of contacts.
- Open up Contact app on your iPhone. Select one of contacts from the contact list.
- Click on "Share Contact" and you'll have 2 options: via email or messages.
- You can select to share via the 2 choices as what you want.
More Tutorials on:
Wednesday, November 2, 2016
Tuesday, October 25, 2016
Sunday, October 23, 2016
Thursday, October 20, 2016
Wednesday, October 19, 2016
Tuesday, October 11, 2016
2 Ways to Transfer Photos from iPhone 5/5C/5S to iPhone/iPad Pro/iPad Air 2
Tutorial 1: Transfer Photos from iPhone to iPhone with iTunes.
Apple has developed iTunes to help iOS users resolve any problems that they may meet with their iPhone/iPad/iPod.What you'll need: 2 iOS devices (iPhone/iPad/iPod Touch), USB cable, iTunes installed on computer
- Plug in your old iPhone into a USB port on computer, you might also see a prompt on the iOS device asking you to Trust This Computer. Tap Trust to continue.
- After successful detection, click Photo App from your iPhone folder and drag photos to an empty folder on computer, you can name in "IMAGE".
- Now launch the latest version of iTunes and connect new iPhone/iPad to PC.Wait your iPhone/iPad to be detected by iTunes.
- After detection, click your iPhone/iPad icon and tap on "IMAGE" from the sidebar.
- select copy photos from the folder on computer called "PHOTOS" lastly, click sync to start transferring photos from old iPhone to your new iPhone/iPad.

Tutorial 2: Transfer Pictures from iPhone to iPhone Using Phone Data Transfer
Some iPhone users complain that the way above is too complicated and takes much time. In view of this problem, Jihosoft studio has developed a phone data transfer tool, which enables you to transfer different types of data between 2 devices.
What you'll need: 2 iOS devices (iPhone/iPad/iPod Touch), USB cable, Phone Data Transfer
- Get this software from official site of Jihosoft. Launch it on your computer and click on "Phone to Phone".
- Connect both of your iPhone or iPad to PC. After detection, all data of old iPhone will be displayed as below.
- Select "Photos" from the data types and click "Start Copy" to begin the transferring process.

More ideas on:
How to Transfer Music from iPhone to iPhone (6S & 6S Plus Included)
How to Transfer SMS/iMessages from iPhone to iPhone
Sunday, September 25, 2016
How to Transfer WhatsApp Messages from Android to iPhone 7/6S/6S Plus
Nowadays, whatsApp has gradually become the the first choice for people in consideration of its convenience and benefits. whenever they are chatting with friends, families, or negotiating with their partners, they will type or send voice through whatsApp.

At the same time, more android users switched their phones to iPhone for its better performance. However, what troubles them most is to transfer important whatsApp messages from Samsung Galaxy S4/S5, HTC One, Sony Xperia, LG G4 to iPhone 7/6/6s/6s Plus. So this article will offer 3 methods to transfer whatsApp messages from Android to iPhone.


Method 1 : WhatsApp Android to iPhone Using Email Chat
1. Go to the “Settings” at WhatsApp from your old device, click the “Chat settings”.
2. Select the whatsApp messages you want to transfer. A window will pop out says that “Attaching Media will generate a larger email message”. Click “ Without Media” or “ Attach Media” according to your needs.
3. Enter your email number at the sending interface and click to the “Send” option.
4. Log in your email at your new device, you can view your WhatsApp messages at email from your new device. But you can’t sync WhatsApp messages to your WhatsApp application.

Method 2: Transfer WhatsApp from Android to iPhone Using Backup
Step 1: First, back up your WhatsApp messages on your old device.
Find “Settings” at WhatsApp from your old device, click “ Chat settings”, then click “Email chat” from the showing list.
Step 2: Uninstall Whats App on your old device.
Step 3: Install Whats App and register your original phone number at new device.
A window will pop out says that message backup was found. Click “Restore”, and transfer WhatsApp messages from iPhone to Android will be finished soon. Same as transfer WhatsApp messages from Android to iPhone.
Method 3: Android WhatsApp to iPhone Transfer Using WhatsApp Transfer Manager.
1. Download and launch Android iPhone WhatsApp Transfer +, connect both of your android and iPhone to computer until it is successfully detected.
2. Select the device that you want to transfer whatsApp messages from, then right click this device and select “Transfer Messages from Android to iPhone”.


Besides whatsApp messages, here supplies more information about transferring contacts from Android to iPhone with Jihosoft Phone Transfer software.
Thursday, September 22, 2016
How to Print SMS/iMessages/MMS/Text Messages from Android Phones
Text messages could be very valuable on iPhone sometimes, as they keep important communicating information. Thus it has gradually become increasingly important to backup these messages for double protection. And the easiest method is to print them on paper or on other place. This article will discuss how to print text messages from different android devices, including Samsung, Huawei, HTC, Sony, LG, etc.
Print Text Messages from Android with Phone Transfer Manager
The most direct way to print text messages from android phone is to transfer them to computer, then print them out. And the most suitable tool to do it is phone transfer manager from Jihosoft. Features of this powerful tool:


Print Text Messages from Android with Phone Transfer Manager
The most direct way to print text messages from android phone is to transfer them to computer, then print them out. And the most suitable tool to do it is phone transfer manager from Jihosoft. Features of this powerful tool:
- Save text messages as a PDF
- Print entire text conversations in seconds
- Prints texts with sender, date & time
- Print SMS messages to Google CloudPrint
Step 1: Download and launch this tool from official site of Jihosoft, click "Backup Your Phone"
Step 2: Connect your android phone to computer using USB cable.
Step 3: After successful connection of android phone, all data types will be listed as below, you just select "Messages" from the data types and click "Start Copy" to transfer text messages from android phone to computer.
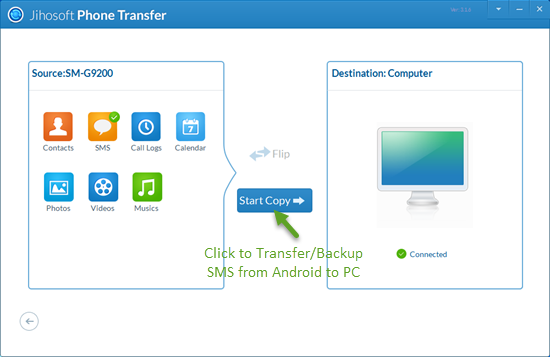
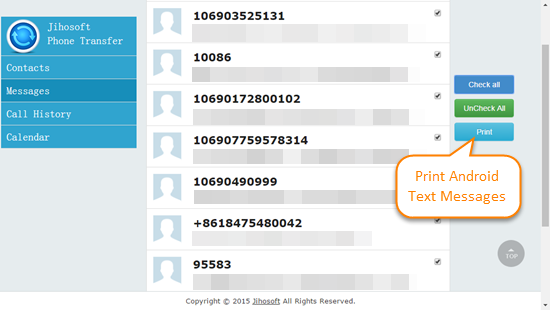
Step 4: Open up the backup folder of "html" format and click "Print" to print text messages out.
More useful articles:
Transfer and Backup SMS/Text Messages from Android to PC
3 Methods to Transfer & Backup Android Photos/Videos to PC
Step 4: Open up the backup folder of "html" format and click "Print" to print text messages out.
More useful articles:
Transfer and Backup SMS/Text Messages from Android to PC
Tuesday, September 13, 2016
3 Ways to Transfer Data from Old iPhone 4/5/5C/5S to iPhone 7/7 Plus/6S
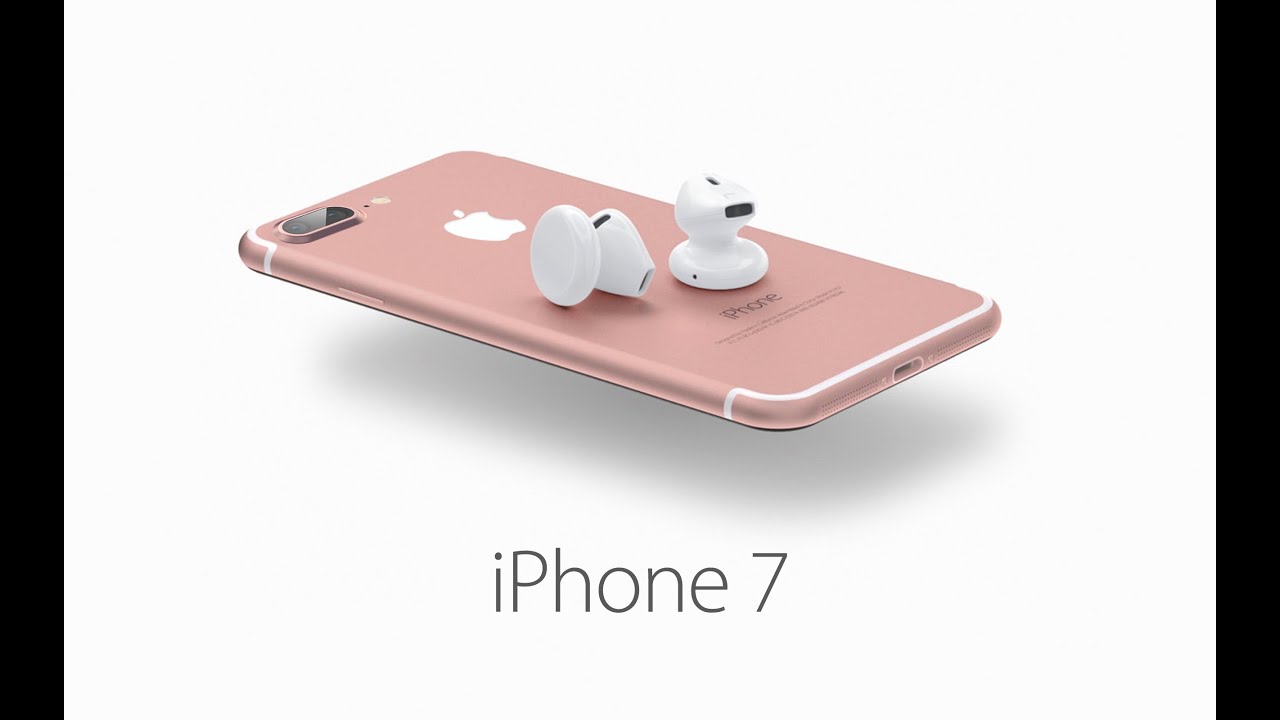
The hottest thing in this September may be the release of iPhone 7, and some of you may can't wait
to upgrade to this great device. Then you're probably looking to move everything from your old iPhone 4/5/5C/5S to the new iPhone 7. However, it is researched that nearly 99% of iPhone users know little about how to transfer data from their old iPhone to the new one after the excitement of getting a new iPhone 7. Take it easy, in this blog you will learn 3 simple ways to transfer data from iPhone 4/4S/5/5s to iPhone 7.
To get rid of the trouble with iTunes or iCloud when transfer data from old iPhone to new iPhone, you can get help from Jihosoft Mobile Data Transfer. This iPhone to iPhone Transfer tool enables you directly transfer contacts, text messages, photos, videos, music and more to new iPhone 7.

Download a copy of Jihosoft Mobile Phone Transfer software from its official site and follow the on-screen instructions to install it on your computer. Then run it.
Step 2: Connect Your iPhone Devices to PC
Plug both your old iPhone and new iPhone 7 into the computer via USB cables. When connected, you can click Flip to set the old iPhone as Source and new iPhone as Destination.
Step 3: Transfer Data from iPhone to iPhone 7
In the source phone panel, select the contents you want and click Start Copy to transfer data from old iPhone to new iPhone 7. When the transfer process is completed, click OK to end it.

You can first take a backup of your old iPhone and then restore the backup to your new iPhone 7 or se using iTunes or iCloud. This process will transfer your saved messages, email accounts, photos, notes, and other personal settings to your new iPhone.
Option 1: Via iTunes
1. Take a backup of your old iPhone using iTunes. After the backup is complete, turn off your old iPhone.
2. Turn on your new iPhone 7 and complete the setup assistant. When prompted to Set Up iPhone, tap on Restore from iTunes Backup.
3. Now connect your new iPhone to iTunes. iTunes will ask you to restore from backup or set up as new.
4. Select the backup of your old iPhone and choose Continue. When the restore process is complete, your new iPhone will restart.

Option 2: via iCloud
1. On your old iPhone, go to Settings and navigate to iCloud > Backup > Back Up Now. After the backup is complete, check the Last Backup time and turn off your old iPhone.
2. Turn on your new iPhone and follow the on-screen instructions to complete the set up assistant. When prompted to Set Up iPhone, tap on Restore from iCloud Backup.
3. Enter your Apple ID and password, tap Next and agree to the Terms and Conditions.
4. Select the latest backup of your old iPhone and tap Restore. When the restore process is complete, your iPhone will restart.

More Topics
How to Transfer Data from Android to new iPhone 6S/6S Plus/SE
Tuesday, September 6, 2016
How toTransfer Musics from iPod (Touch) to computer without iTunes
When it comes to listen to music, most music lovers would like to choose iPod and iPod Touch rather than iPhone owing to its portability, long battery life, large storage for music, etc. And they are used to storing their favorite musics on PC, iPod Touch or other MP3 players. However, have you ever imagined that all of these musics will be totally destroyed once there is something wrong with your iPod, iPod Touch or PC. Thus it is wise to transfer music from iPod to computer in case of data loss.

To transfer songs from iPod to computer with iTunes, you are required to sync your iPod with iTunes. Most people are unwilling to sync iPod with iTunes as all of the iPod data including musics, contacts, messages, photos, videos, notes will be synced to iTunes and original data will be overwritten. So here below offers a method to transfer iPod music to computer without iTunes.
How to Transfer iPod Music to Computer without iTunes
Step 1: Download iPod Music Transfer of Windows version or Mac version on your computer and launch it.
Step 2: On the homepage, click on "Backup Your Phone" tab and click "next" to go on.
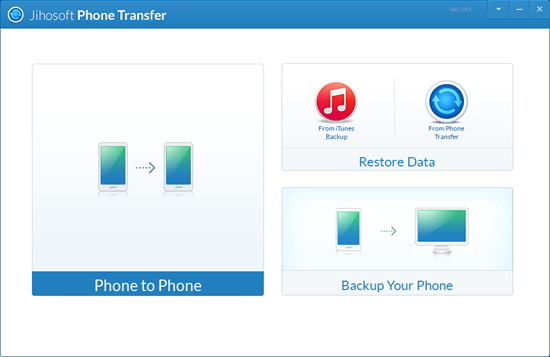
Step 3: Connect your iPod to computer via USB cable or Wi-Fi. The program will list iPod as "Source" phone once detected it. Select "Musics" from the file types and click "Start Copy" to transfer music from iPod to PC.

Don't miss:
Top 3 itunes alternatives to transfer music to iphone, ipod, ipad

To transfer songs from iPod to computer with iTunes, you are required to sync your iPod with iTunes. Most people are unwilling to sync iPod with iTunes as all of the iPod data including musics, contacts, messages, photos, videos, notes will be synced to iTunes and original data will be overwritten. So here below offers a method to transfer iPod music to computer without iTunes.
How to Transfer iPod Music to Computer without iTunes
Step 1: Download iPod Music Transfer of Windows version or Mac version on your computer and launch it.
Step 2: On the homepage, click on "Backup Your Phone" tab and click "next" to go on.
Step 3: Connect your iPod to computer via USB cable or Wi-Fi. The program will list iPod as "Source" phone once detected it. Select "Musics" from the file types and click "Start Copy" to transfer music from iPod to PC.

Don't miss:
Top 3 itunes alternatives to transfer music to iphone, ipod, ipad
Subscribe to:
Posts (Atom)